Searching for “dry rot wood repair near me” often starts with one troubling clue. Trim feels soft, a window sticks, or a stain keeps returning. If decay sits behind stucco, a surface patch won’t resolve the hidden damage or its moisture source.
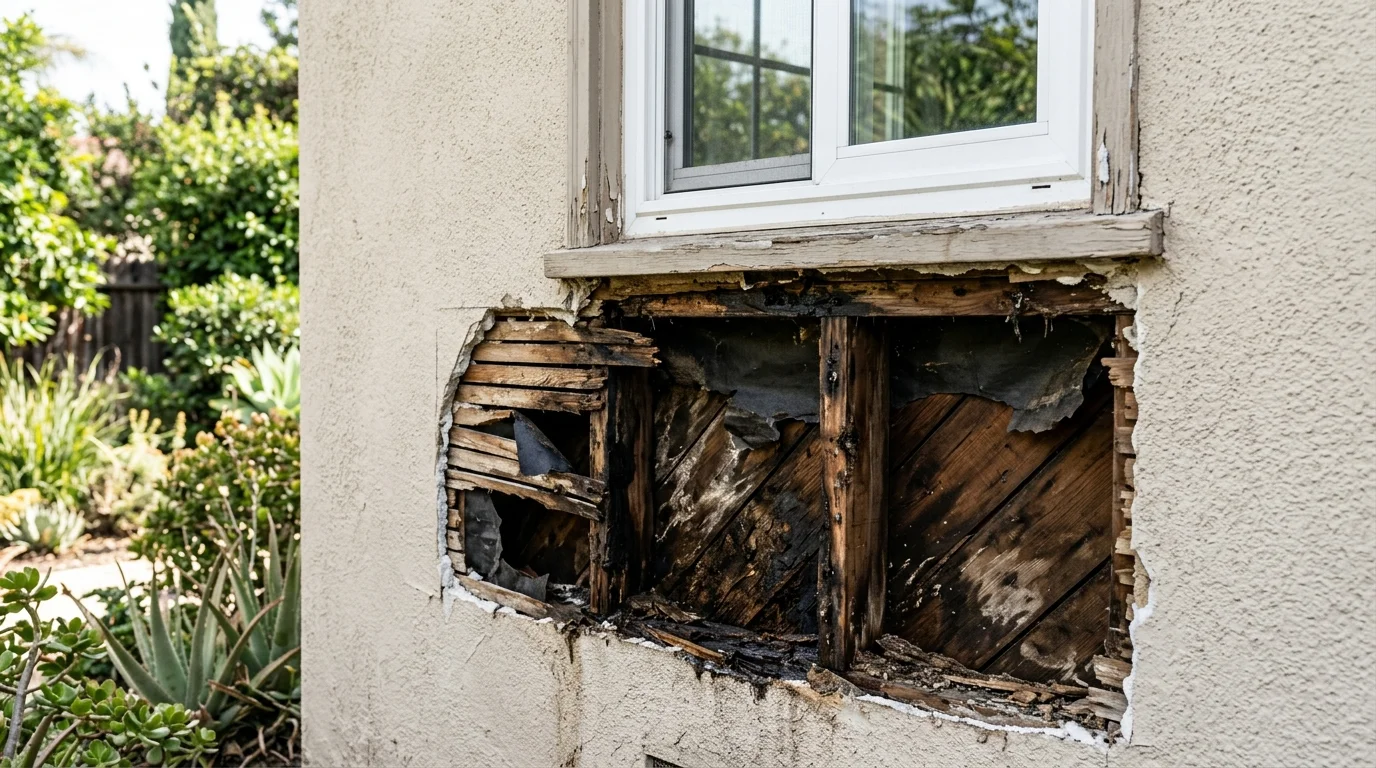
What dry rot is, and why the name is misleading
Dry rot usually describes fungal decay in wood. Despite the name, the process depends on moisture. The wood may feel dry when you discover it, but damp conditions allowed the deterioration to begin.
That distinction matters when planning a repair. Removing soft wood addresses the damaged material. It doesn’t explain how moisture reached that material or whether nearby areas remain damp.
Wood decay can affect trim, sheathing, blocking, and framing behind the exterior finish. Each material has a different role in the wall. A discolored board may remain firm, while an ordinary-looking section nearby has lost strength. Appearance alone can’t define the repair boundary.
The word “rot” also gets used loosely. Staining, swelling, delamination, and insect damage can resemble decay. A qualified professional should identify what’s actually damaged before recommending demolition.
For homeowners, the practical goal is simple. Find the moisture path, determine the affected area, and repair the wall in the correct order. Covering the stain or filling a crack skips those steps.
How water reaches framing behind a wall that looks fine
A stucco wall is an assembly, not one solid layer. The visible finish covers base material, lath, a water-management layer, and the supporting wall. Water can follow concealed paths between those components.
The entry point isn’t always directly above the damaged wood. Moisture can move along framing, sheathing, fasteners, or a poorly sealed opening. Gravity influences the path, but wall details can redirect it sideways.
This is why an intact surface doesn’t rule out damage. The finish may have no obvious hole where moisture entered. A small failed joint around another component can admit water behind a much larger area.
San Diego County properties also face different exposure patterns. A Point Loma wall, a La Mesa side yard, and a Chula Vista patio wall won’t share identical conditions. Wall direction, roof shape, grading, irrigation, and nearby construction all affect the investigation.
The useful question isn’t simply whether the stucco has cracks. It’s where moisture can enter, where it travels, and where it can leave. A repair plan should answer all three.
The usual entry points: windows, decks, hose bibs, roof junctions
Windows deserve close attention because several materials meet around each opening. The stucco, trim, sealant, flashing, and window frame must work together. A failure at one edge can send moisture behind an otherwise sound wall. Our guide to stucco around windows, leaks, and repair explains that entry point in more detail.
Deck connections can create another concealed route. Posts, ledgers, railings, and wall penetrations interrupt the exterior assembly. The inspection should follow those connections instead of examining only the open wall below them.
Hose bibs and other wall penetrations are easy to overlook. Movement, damaged sealant, or an incomplete surrounding detail can leave a path around the pipe. Irrigation spray may keep that area wet without producing an obvious indoor leak.
Roof-to-wall junctions also need careful review. The visible damage may appear near a window or lower wall even when water entered higher up.
These locations are starting points, not automatic diagnoses. Dark staining beside a hose bib doesn’t prove the hose bib caused it. The contractor should trace the path before rebuilding anything.
Why stucco hides the problem longer than siding does
Many siding systems have visible joints and individual pieces. Changes in those pieces can reveal a localized problem. Stucco presents a broad, continuous face, so the surface may look consistent while conditions change behind it.
The finish can also remain hard after the supporting sheathing has deteriorated. That creates a misleading impression. A firm exterior surface doesn’t confirm that every hidden layer remains sound.
Patching the first visible crack can make the problem harder to track. The crack may be unrelated, or it may show movement caused by damaged support below. Either way, sealing the face without investigating recurring moisture leaves the main question unanswered.
Stucco removal is sometimes the only way to see the full condition. That doesn’t mean every stain requires opening a large wall section. It means the investigation should progress from observation and testing to selective opening when the evidence calls for it.
A good contractor explains what’s known, what remains uncertain, and what opening the wall may reveal.
Outward signs: soft trim, staining, a hollow sound, sticking windows
Soft or crumbling wood trim is one of the clearest reasons to investigate. Pressing gently with an appropriate tool may reveal deterioration that paint concealed. Homeowners shouldn’t aggressively probe structural components or create new openings.
Staining can appear on stucco, trim, interior drywall, or flooring near an exterior wall. A stain shows that moisture was present. It doesn’t show whether the area is still wet or identify the source.
A hollow sound may suggest loose stucco or separation within the assembly. It isn’t proof of rotten framing. Sound changes with wall construction, finish thickness, and the location of framing.
Sticking windows deserve attention when they appear alongside moisture clues. Swollen materials, movement, installation issues, and several unrelated causes can affect operation. The symptom becomes more useful when considered with staining, softness, or recurring dampness.
Other clues include peeling coatings, open joints, displaced trim, and patches that repeatedly discolor. None defines the repair scope alone. Together, they help a professional choose where to test and whether a controlled opening is justified.
How far it spreads before anyone notices
Hidden damage rarely follows a neat rectangle. Moisture may affect one framing bay, cross an opening, or collect at the wall’s lower edge. The damaged area can also differ between the sheathing and the framing beneath it.
That’s why the first exposed section isn’t always the final repair boundary. Once the stucco is opened, the contractor can follow staining and material changes toward firm, dry surrounding areas. Additional opening may be recommended if the visible edge doesn’t reach sound material.
The source and the damage may also occupy different locations. Water entering at a roof junction can appear farther down the wall. Damage below a window may extend beyond the width of that window if moisture traveled sideways.
No responsible estimate can define concealed conditions with perfect accuracy before access exists. Ask the contractor how discoveries will be documented and approved. The plan should distinguish the expected opening from any added work found after demolition.
Probing and moisture readings versus opening the wall
Visual inspection comes first. The contractor looks at joints, penetrations, roof connections, trim, grading, and the pattern of visible damage. Interior symptoms can add context when the wall is accessible from both sides.
Probing helps evaluate exposed wood, but it only describes the spot tested. Moisture readings can compare locations and identify areas that deserve attention. Those readings also require interpretation based on the material, instrument, and current conditions.
Neither method provides a complete view through every wall layer. A low reading today doesn’t prove that the wall was never wet. A high reading identifies moisture but doesn’t automatically define how much wood must be replaced.
A controlled opening provides direct evidence. It lets the contractor inspect the sheathing, framing, barrier, lath, and surrounding connections. The opening should be large enough to reach sound material and understand the water path.
Before authorizing work, confirm the contractor’s license through the California Contractors State License Board. Ask who will assess any framing damage and whether another licensed trade is needed for part of the scope.
What the repair sequence looks like once the wall is open
The sequence starts with access. The contractor removes enough finish and underlying material to expose the suspected area without treating the entire wall as damaged by default.
Next comes assessment. Loose, decayed, or delaminated material becomes visible. The contractor identifies the repair boundary and checks whether the suspected entry point connects to the damage.
Affected wood is then addressed according to its condition and role. Sheathing, trim, blocking, and framing aren’t interchangeable. Framing work may require coordination with another qualified professional. The city or county that issues permits where you live determines whether the planned scope needs approval.
After the wood work, the wall assembly is rebuilt from the inside outward. That includes restoring the water-management details before installing lath and new stucco. Finish work comes last.
The final stucco patch needs compatible materials, a stable edge, and thoughtful texture matching. Color may still vary because existing surfaces have weathered.
Ask for photos before the wall is closed. They can document the exposed condition, repaired wood, and rebuilt layers. They’re more useful than relying on a description after everything is covered.
Rebuilding the barrier and lath before any new stucco goes on
New stucco shouldn’t cover an incomplete wall assembly. The concealed layers need to be restored before the surface finish begins.
The water-management layer must connect correctly with nearby openings and penetrations. The exact detail depends on what the contractor finds. A window edge, roof junction, deck connection, and pipe penetration won’t receive one interchangeable treatment. Learn more about waterproofing and moisture barriers for this part of the wall system.
Lath provides the base for the new stucco. Damaged, rusted, cut, or removed sections may need replacement across the repair area. Proper transitions matter because the patch meets an existing assembly at every edge. Learn more about lath replacement and why it happens before the finish coat.
Once the hidden layers are complete, the contractor can rebuild the stucco and match the surrounding texture. The repair should be judged as a wall assembly, not just a patch that looks acceptable from the sidewalk.
Fixing the source, or paying for the same repair again
Replacing decayed wood without correcting the moisture source leaves the wall exposed to another failure. Source control belongs in the repair scope, even when another trade handles part of it.
Ask the contractor to identify the suspected entry point in writing. The answer should be specific, such as a failed window perimeter detail or an opening around a penetration. “Water got behind the stucco” describes the result, not the cause.
Then ask how the proposed work changes that path. The answer may involve rebuilding a transition, correcting a joint, or coordinating work at an adjoining component. It shouldn’t rely only on coating the visible stain.
Conditions can overlap. A window detail and irrigation exposure may both affect one area. The contractor should separate confirmed findings from possibilities and explain what can’t be known until the wall opens.
After repairs, keep an eye on the original warning signs. Returning stains, soft trim, or renewed movement deserve another inspection. Fresh paint can hide a symptom, but it can’t prove the moisture path is gone.
When to call us
Soft wood, recurring stains, sticking windows, or suspected damage behind stucco call for a licensed stucco pro. We connect homeowners across San Diego County with licensed independent contractors who can assess the wall and explain the next step.
Call us at (858) 400-4352 and we’ll connect you with a licensed local stucco contractor.