Installing EIFS stucco means building a coordinated wall assembly, one layer at a time. The usual sequence moves from wall preparation and moisture details to insulation board, reinforcing mesh, base coat, primer, and finish. Each product and transition must follow the selected system manufacturer’s written instructions.
This guide explains what homeowners can watch during professional installation. It isn’t a substitute for the manufacturer’s details or the project documents. If you need a quick system overview first, read what EIFS synthetic stucco is.
What gets checked on the wall before any board goes up
Installation starts with the existing wall, not the foam board. The contractor checks whether the surface is sound, properly aligned, and ready for the specified attachment method. Damaged sheathing, loose materials, dirt, and unexpected openings need attention before they’re covered.
Openings and penetrations deserve an especially close look. Windows, doors, pipes, vents, light fixtures, and utility boxes interrupt the wall surface. The project details should show how the EIFS meets each one. Covering an unclear transition only hides the question behind finished material.
The contractor should also compare actual conditions with the plans and manufacturer’s instructions. A detail that fits one window style may not fit another. The same applies where walls meet roofs, decks, foundations, or different cladding materials.
San Diego County sites shouldn’t be treated as interchangeable. A wall in coastal North County may present different field conditions than one in East County or the South Bay. The installer should document what’s present and resolve conflicts before starting.
Homeowners can ask to see this initial review. Photos of the uncovered wall create a useful record. They also make later conversations clearer if an opening, transition, or damaged area needs a revised detail.
The substrate and the water-resistive barrier underneath
The substrate gives the assembly its working surface. It needs to match the EIFS design and the chosen attachment method. The contractor should identify the substrate before ordering materials because attachment instructions can change with the surface underneath.
Where the project calls for a water-resistive barrier, that layer goes on before the insulation board. It shouldn’t be treated as decorative wrap. Edges, openings, penetrations, and connections need to follow the approved project details.
Look closely at sequencing around windows and doors. The surrounding components need to direct water along the intended path. Random patches, unexplained cuts, and buried gaps deserve questions before foam covers them.
The water-management plan should also connect with nearby wall components. That includes the lower termination, roof intersections, utility penetrations, and changes between claddings. No single layer can correct a poorly planned transition after the surface is closed.
The exact barrier product, number of layers, and installation pattern can’t be chosen from a general article. Those decisions belong in the manufacturer’s documents and project specifications. Your local building department can confirm which permits and project documents apply at your address.
Fastening or adhering the insulation board and why the method matters
EIFS insulation board may be attached according to a specified adhesive method or mechanical fastening method. The contractor shouldn’t switch between them casually. The selected system documents should identify the compatible substrate, products, tools, and attachment pattern.
Before attachment, boards are laid out to reduce awkward joints. Corners around windows and doors need the manufacturer’s prescribed board layout. Small filler pieces and poorly placed seams can make later coating work harder and leave an uneven surface.
With an adhesive installation, the application pattern matters because the wall may need a defined drainage path. The contractor should follow the written pattern instead of spreading adhesive wherever it seems convenient. Adhesive also belongs on the approved surface, not on dust, loose material, or an unresolved barrier defect.
Mechanical attachment brings different checks. The specified fasteners need to suit the substrate and sit as directed. Heads that protrude can telegraph through later layers. Overdriven fasteners can damage the board.
The finished board plane should look continuous and stable before coating begins. Homeowners don’t need to judge structural adequacy by sight. They can ask which manufacturer detail governs the attachment and request that visible irregularities be corrected before the next layer hides them.
Rasping the board flat, and what happens when this step is rushed
Once the board is secure, the installer prepares a flat surface for the coating layers. Rasping removes minor differences between adjacent boards and blends high edges. The goal is a consistent plane, not aggressive shaping that gouges the foam.
This stage often looks less dramatic than applying a finish coat. It still affects the final appearance. Raised seams, ridges, and uneven board faces can remain visible after coatings are applied, especially under angled sunlight.
The wall should be checked from more than one viewing direction. San Diego homes can have long, uninterrupted elevations where small surface changes become noticeable. Corners, window returns, and foam trim also need clean transitions.
Rasping creates loose particles, so the surface must be prepared as directed before base coat begins. Coating over debris works against a clean bond.
A homeowner can watch for hurried movement from attachment straight into coating. Ask whether the board plane has been inspected and accepted. If an area already looks wavy before base coat, covering it isn’t a convincing correction.
The base coat and embedding the reinforcing mesh
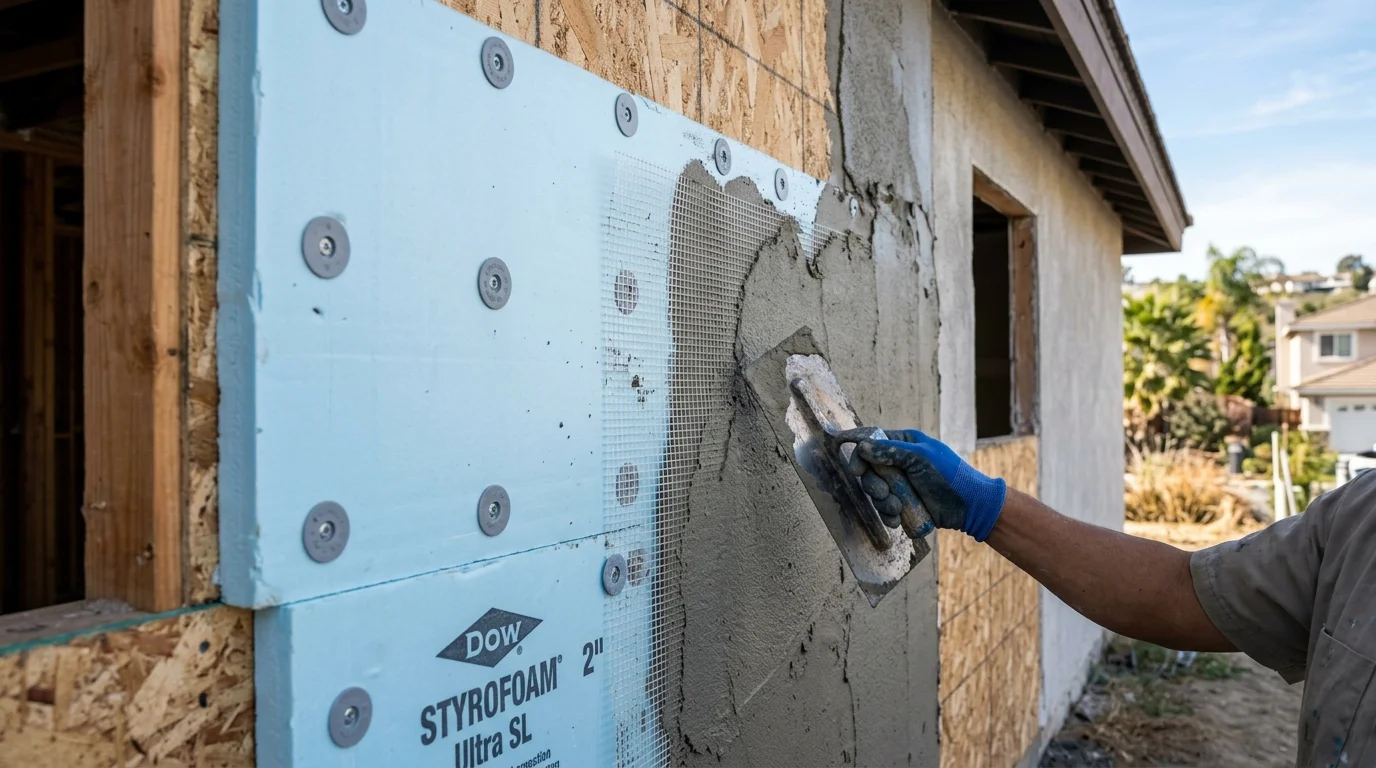
The base coat and reinforcing mesh form a continuous reinforced surface over the insulation board. The installer applies the compatible base-coat material, places the mesh into it, and works the surface according to the selected system’s directions.
Mesh shouldn’t sit loosely on the wall with coating merely painted over it. It needs to be embedded as the manufacturer specifies. The installer also follows the required treatment at overlaps, corners, openings, and accessory transitions.
Window and door corners receive particular attention because several materials and planes meet there. Any additional reinforcement should match the approved detail. Improvised scraps aren’t a substitute for the specified layout.
After embedding, the installer checks for exposed mesh, ridges, wrinkles, and missed areas. These issues are easier to correct before the surface advances to primer and finish. The base-coat plane should also support the selected finish texture.
Don’t compare this step with cement-plaster scratch and brown coats. Traditional stucco installation uses a different wall assembly and sequence. EIFS materials aren’t interchangeable with products selected for conventional stucco.
Where a heavier mesh belongs and why impact zones are different
Some project designs call for heavier reinforcing mesh in areas more likely to receive impact. Examples may include walls near entries, walkways, service areas, or other exposed locations identified in the project documents.
Placement shouldn’t come from a generic height copied from another job. The EIFS manufacturer and project designer determine the mesh type, coverage, transitions, and layering method. Those written details should be available before the installer reaches this stage.
Heavier mesh also needs a planned transition into surrounding reinforcement. A raised edge or abrupt buildup can affect the finished plane. The crew should prepare the area so the reinforcement remains continuous and the finish doesn’t advertise the change underneath.
Homeowners can ask which elevations receive added reinforcement and why. A marked drawing is easier to verify than a verbal promise. Before coating hides the mesh, check that the installed locations match that drawing.
The primer and finish coat, and why cure time is not optional
Primer and finish come after the reinforced base surface reaches the condition required by the manufacturer. The installer shouldn’t choose the next step only because the wall looks dry from a distance.
Product instructions control the waiting period and acceptable application conditions. Temperature, moisture, shade, direct sun, and weather exposure can affect job planning. The contractor should record the products used and follow their current instructions rather than relying on a habit from another system.
Primer helps prepare the surface for the specified finish. It isn’t a repair for exposed mesh, deep ridges, or an uneven base coat. Those defects should be corrected at the proper layer.
The finish coat supplies the visible color and texture. Work should be organized around natural stopping points because interruptions can remain visible across a broad wall. The installer also needs a consistent technique across connected elevations.
Ask how the contractor confirms that each layer is ready. “It feels dry” isn’t the same as following written product requirements. Labels, technical documents, and daily job records give you a clearer answer.
Drainage details: starter track, terminations and sealant joints
Drainage details need a connected path from the upper wall to a safe exit. The starter track or lower termination should match the chosen EIFS system and the conditions at the bottom of the wall.
Terminations occur wherever the EIFS stops. That may include openings, roof connections, foundations, adjacent cladding, and penetrations. Each location needs enough space and the correct components for its specified transition. Smearing finish material across every gap isn’t a drainage plan.
Sealant joints are separate, coordinated parts of the assembly. The contractor should identify where they belong, what surfaces form the joint, and which compatible materials are specified. Windows and doors may have their own installation requirements, so the EIFS detail has to meet them cleanly.
Before these areas disappear under finish, take photographs. Look for a consistent lower edge, complete transitions, and clearly formed joints. Ask about any place where foam, mesh, or coating ends without an obvious detail.
If an existing wall already shows soft areas, staining, open joints, or damaged finish, new coating alone may not address the source. An EIFS repair contractor can open the affected area and determine what needs correction.
Barrier EIFS versus drainage EIFS at installation time
The practical installation difference is the planned water-management approach behind the exterior surface. A drainage EIFS design includes a defined path intended to move incidental water downward and outward. A barrier approach depends on the specified exterior plane and carefully completed transitions.
That distinction affects early work. The substrate, barrier, attachment pattern, lower termination, openings, and penetrations must all match the selected approach. A contractor can’t decide near the finish stage that the wall should have been assembled another way.
Homeowners should ask for the exact system name and written installation details. Product containers from unrelated manufacturers don’t prove that the complete wall follows one compatible assembly. The drawings and product documents should agree.
Don’t identify an existing wall by tapping it or looking at its texture. Those observations don’t reveal every concealed layer. If the wall must be classified before repair, the contractor may need records, careful inspection, or limited exploratory work.
Your local building department can explain which documents it needs for the property. The contractor remains responsible for following the approved project details and the selected manufacturer’s requirements.
What a homeowner can watch for while the work is happening
You don’t need to direct the installer’s technique. Focus on documentation, sequencing, and visible consistency. Those checks help you ask useful questions without pretending that a general guide replaces project-specific instructions.
Before work begins, confirm the contractor has identified the EIFS system and substrate. Ask how openings, lower terminations, penetrations, and material changes will be handled. Verify the contractor’s license through the CSLB license check.
During installation, photograph each layer before it’s covered. Watch for unresolved wall damage, loose barrier edges, uneven board joints, exposed mesh, and unfinished transitions. Ask about anything that differs from the drawings or manufacturer’s details.
Keep product names, color selections, technical documents, permits, inspection records, and job photos together. That file becomes useful when a future owner or repair contractor needs to understand the wall.
Finally, judge the complete elevation in different light. Look along the wall instead of only standing directly in front of it. Texture should appear intentional, while openings and terminations should look clean and planned.
When to call us
EIFS installation needs a licensed stucco professional when a wall is being built, reclad, opened for moisture investigation, or repaired across several layers. Call us at (858) 400-4352 and we’ll connect you with a licensed local stucco contractor.