Matching new stucco to old stucco becomes the defining detail when an addition reaches the original exterior. The finished wall needs more than a similar color. The contractor also needs a clear plan for the concealed edge, drainage, movement, texture, and final stopping point.
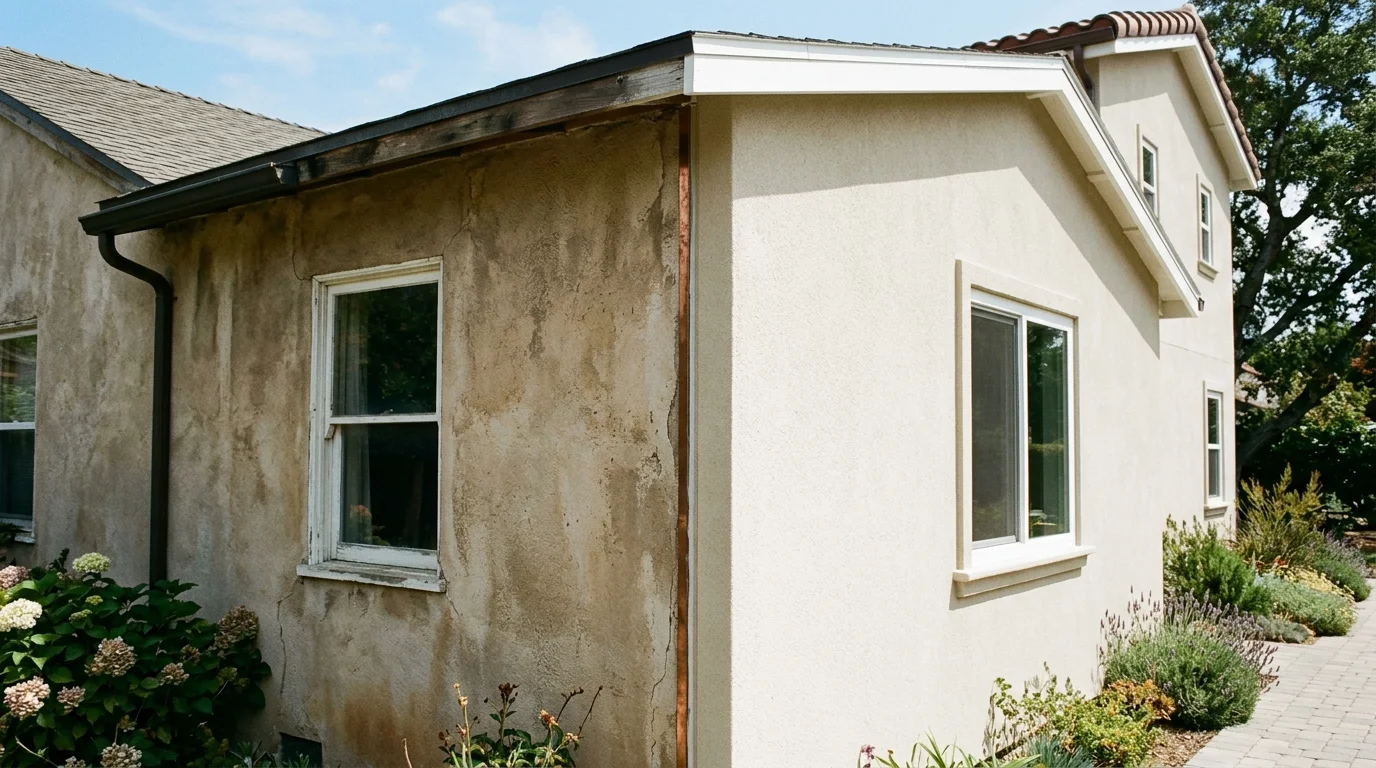
Why the tie-in starts below the visible finish
The visible finish is what you’ll judge from the driveway. It isn’t the first part the contractor needs to understand. Before choosing texture or color, the licensed stucco pro should examine how the new wall reaches the existing wall.
A photograph of the old finish can’t show everything behind it. The edge may reveal earlier patches, coatings, repairs, or a different wall assembly. Those conditions should be documented after the work area becomes accessible. The contractor can then explain what remains, what gets removed, and where the new work stops.
Ask for that explanation before approving the final appearance. The proposal shouldn’t treat the tie-in as a small cosmetic patch. It should identify the old wall edge as a distinct part of the addition. That keeps the concealed transition from disappearing inside a broad phrase such as “complete stucco work.”
Don’t copy a generic fastening, flashing, joint, or water-management detail from another house. The licensed contractor and local building department should confirm the approved assembly for your project. If the property is within the City of San Diego, start with Development Services. Homeowners elsewhere should check with the authority handling their addition permit.
Our guide to how stucco is installed provides general process context. Your addition still needs an address-specific plan. A City Heights remodel, an Encinitas addition, and an El Cajon expansion shouldn’t be evaluated from the same stock detail without checking each existing wall.
What must be checked at the old wall edge
Start by recording the wall before any finish gets disturbed. Photograph the transition area, nearby openings, corners, penetrations, visible cracks, stains, and previous patches. These photos establish the starting condition. They don’t diagnose what caused a mark or confirm what sits behind the finish.
The licensed pro should inspect the exposed edge once access is available. Ask the contractor to describe the existing wall assembly in writing. The scope should also say whether adjacent material can remain or whether the work area needs to extend farther. If the answer changes after opening the wall, request a written scope update before that added work proceeds.
Pay close attention to places where the addition meets another feature. Windows, doors, roof edges, utility penetrations, trim, corners, and the lower wall can complicate the boundary. The correct treatment depends on the conditions uncovered and the assembly approved for that project. A finish sample can’t settle those details.
Previous paint and finish work also deserve attention. Ask whether the surface beside the addition has been painted, coated, patched, or retextured. The answer shapes the visual matching plan, even when the hidden transition is sound. Don’t assume a matching color name means the surfaces will look identical.
San Diego County has many separate neighborhoods and building histories. A street name or ZIP code won’t tell a contractor what’s behind one wall. Inspection at the actual transition matters more than assumptions about the area. If you’re comparing proposals, confirm that each contractor inspected the same edge and included the same limits.
Before hiring, check the contractor through the official CSLB license search. Stucco Pro SD connects homeowners with licensed independent local pros, but the selected contractor performs and documents the physical work.
How movement and drainage affect the transition
The old wall and the addition meet at a defined boundary. Your proposal should explain how the design addresses that boundary, including movement and drainage. It shouldn’t hide both subjects under a promise to “blend” the finish.
Ask the contractor to mark the proposed transition on an elevation or job photo. That drawing should show whether the finished boundary remains visible or continues across the area. It should also identify how the transition relates to nearby corners, openings, roof edges, and lower-wall conditions. The contractor and building department determine the approved construction detail.
Drainage needs the same clarity. Ask where water is expected to travel at the old-to-new boundary and how the proposed assembly handles that path. Don’t accept a color sample as evidence that this question has been resolved. Appearance approval and assembly approval are separate decisions.
Visible staining, soft areas, bulges, or recurring cracks near the transition should be documented before they’re covered. Those signs don’t establish a cause by themselves. They do give the licensed pro a reason to inspect further and explain whether the addition scope needs revision.
The method used for the new wall is another separate decision. Our two-coat versus three-coat stucco guide explains the comparison without turning it into a universal answer. The old-to-new transition still needs its own approved detail, regardless of the broader system selected.
Before work begins, identify who will answer field questions if the exposed wall differs from the drawings. The owner, general contractor, designer, stucco contractor, and building inspector may each have distinct roles. Put the communication path in writing so the finish work doesn’t move ahead while an important transition remains unsettled.
Why texture and color need separate samples
Texture and color should be approved as two separate choices. A close texture match doesn’t document color approval. A close color match doesn’t show how the surface profile will meet the existing finish.
Begin with texture. Ask the contractor to prepare a sample using the proposed finish approach. Review it beside the old wall, not only in a detached sample box. Look from the normal approaches to the house and from the outdoor areas where the addition will be most visible.
The sample location also matters. Sun and shade can change what your eye notices across the day. Review the sample under the conditions that matter at that wall. For a South Bay addition, that might include the view from a side yard. For a coastal North County house, the primary view might be along a narrow setback. The actual property should guide the review.
Handle color as a second approval. Record the selected sample, where it was placed, and who accepted it. If the old elevation contains several colors from fading, paint, patches, or earlier finish work, identify which area serves as the reference. “Match existing” isn’t precise when the existing wall doesn’t look consistent.
Set expectations carefully. A contractor shouldn’t promise that the transition will disappear before inspecting the wall and preparing samples. Decide whether the goal is the closest practical blend or a deliberate stopping point that organizes the elevation. Sometimes the cleanest agreement is about where the change occurs, not a promise that nobody will ever see it.
Our texture-matching service page explains how we connect homeowners with licensed local pros for this work. The matched contractor should provide the samples, explain the limits, and record your approval before finishing the full transition.
What the addition scope should say about the finished joint
The written scope should describe the finished joint as its own work item. That description gives you something concrete to compare across bids. It also reduces disagreements caused by broad terms such as “tie in as needed.”
Ask each contractor to address these points:
- The exact beginning and ending limits of the stucco work.
- The area of the old wall that may be opened or removed.
- The process for documenting concealed conditions after exposure.
- The approved transition assembly and who confirms it.
- The intended location and appearance of the finished boundary.
- The separate texture and color sample process.
- The reference area used for matching the existing finish.
- The treatment of nearby corners, openings, trim, and penetrations.
- The process for written changes if hidden conditions alter the scope.
- Any exclusions involving paint, trim, framing, roofing, or other trades.
- Cleanup responsibilities and the condition expected at completion.
- Any warranty terms offered by the independent contractor.
The proposal doesn’t need to prescribe an unsupported technical detail. It does need to identify who will select and approve that detail. If permitting applies to the addition, ask which local authority reviews the work and how inspection comments will be handled.
Coordinate the stucco scope with the broader addition schedule. The transition can’t be treated as an isolated finish decision if another trade changes the wall edge, opening, or penetration. Ask the general contractor and stucco contractor to confirm that they’re pricing the same drawings and the same revision.
For the larger exterior scope, review our new construction stucco service. Stucco Pro SD can connect you with a licensed independent local contractor, but that contractor prepares the bid, confirms the assembly, performs the work, and provides any warranty.
Keep the accepted sample, marked elevation, proposal, change orders, and completion photos together. If the final joint differs from the approved plan, those records make the conversation specific. You can compare the completed transition with the documented stopping point, texture sample, and color reference instead of relying on memory.
When to call us
Call when your addition reaches an existing finished wall and the transition needs inspection, scope definition, or matching samples from a licensed stucco pro. Call us at (858) 400-4352 and we’ll connect you with a licensed local stucco contractor.