A La Presa stucco patch can fix the damaged spot yet still catch your eye. Before accepting the finish, judge texture first, then color, and decide whether the repair boundary helps the blend.
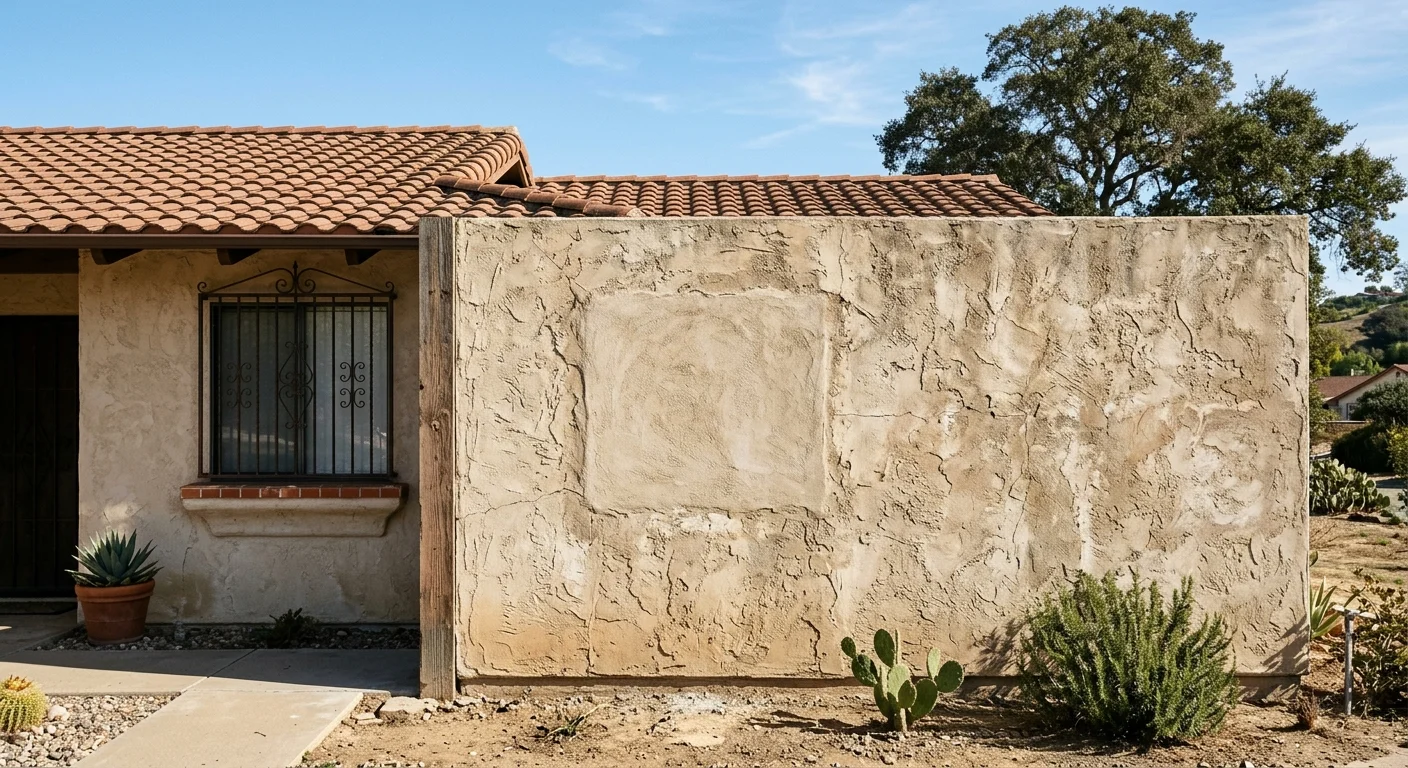
Why a sound patch can still look unfinished
A repair can feel firm and complete but remain visually obvious. The patched area may sit flatter than the surrounding wall. Its raised marks may be tighter, wider, sharper, or more regular. Those small differences can outline the repaired spot from across the yard.
Texture matching isn’t simply choosing a finish name. Two walls described with the same broad label may look different in practice. The real reference is the undamaged surface beside the repair. That surrounding area shows the pattern, spacing, relief, and variation the patch needs to approach.
Start by viewing the repair from places you normally use. Check it from the driveway, front walk, patio, and nearby windows. Then move closer. A close inspection reveals tool marks, while a longer view shows whether the patch reads as one block.
Don’t let color distract you during this first review. A darker or lighter patch can make a close texture match look worse. The reverse also happens. Similar color can hide texture differences until angled light reveals them. Review each issue separately before deciding what needs correction.
The repair’s edges deserve equal attention. A neat center won’t help if a hard outline circles the patch. Look for sudden changes in pattern density or surface height near that boundary.
If the damaged area still needs rebuilding, stucco patching addresses the repair itself. Texture matching is the finish decision that follows. Keeping those decisions separate makes conversations with the contractor clearer.
A perfect disappearance shouldn’t be promised. The useful goal is a repair that doesn’t become the first thing you notice. Agree on the viewing distance and acceptable variation before approving the final appearance.
How aggregate, tool motion, and wall age affect the match
Three details shape the comparison: aggregate, tool motion, and the existing wall’s age. Each can change how a repaired area reads beside the original finish.
Aggregate affects the visible grain. Compare the size and spacing of the raised particles across both surfaces. A patch with a finer appearance may look smoother. A coarser pattern may cast different shadows. The texture name matters less than what you can see on that specific wall.
Tool motion creates another layer of difference. Marks may run in one direction, overlap randomly, or repeat in a noticeable rhythm. A repair can contain similar material yet look mechanical if every pass follows the same line. Ask the contractor to explain how the proposed motion will copy the surrounding pattern.
Wall age matters because the existing surface is the reference being matched. Don’t approve a sample by comparing it with a catalog image or another house. Hold it beside the actual repair area and inspect several nearby sections. That helps reveal whether one small section is representative of the wall.
Request more than one sample when the match remains uncertain. Label each option, photograph its position, and compare it only when the contractor says it’s ready for review. Look from the same distance and angle each time. Changing both the sample and viewing position makes a fair comparison difficult.
The approved research for this page didn’t confirm a La Presa-specific texture standard or local finish rule. Homeowners should use their own wall as the visual reference. Permit questions should go to the building department serving the property.
Our texture-matching service connects homeowners with licensed local pros who can assess the existing finish. For a broader explanation of finish patterns, read our guide to stucco texture matching across San Diego.
When the repair should extend to a natural break
A small repair isn’t always the least noticeable option. Sometimes its boundary sits in the middle of a broad, uninterrupted wall. That location can make every slight change in texture easier to see.
A natural break gives the eye a place where change already makes sense. Possible boundaries include an outside corner, a trim edge, a wall return, or another clear visual transition. The right boundary depends on the actual elevation. It shouldn’t be selected from a generic diagram.
Ask the contractor to show exactly where the repaired finish will stop. Walk the proposed boundary before work begins. From farther away, picture the resulting shape. A narrow rectangle in the middle of a large wall may attract more attention than a wider area ending at a visible edge.
Extending the finish can also create new tradeoffs. More of the existing surface may be covered, and more texture must be reproduced consistently. A larger area isn’t automatically better. It only helps when the proposed boundary produces a calmer, more natural result.
Compare at least two scopes when the patch location is difficult. One may keep the repair close to the damage. Another may carry the finish to a corner or trim line. Ask what remains original under each option and where the new edges will appear.
Don’t approve a wider scope based on the word “blend” alone. Request a clear description of the finished boundary. Confirm whether the proposal addresses texture, color, or both. Those aren’t interchangeable promises.
For stucco texture matching in La Presa, the decision should remain tied to the house itself. The supplied research didn’t verify a neighborhood-wide rule for repair size or termination points. The wall layout, nearby transitions, and homeowner’s viewing priorities should guide the comparison.
How color differences complicate texture approval
Texture and color are separate approval decisions. Treating them as one problem can lead to unnecessary changes.
Color affects how strongly the pattern appears. A light area beside a darker wall may make the repair boundary obvious. Differences in surface appearance can also change what stands out under direct or angled light. That doesn’t prove the texture itself is wrong.
Begin with shape and relief. Look across the wall from the side and compare the shadows within each finish. Check whether the repaired area has similar variation, spacing, and direction. If those features align, record that observation before discussing color.
Next, step back and review the overall color field. Note where the difference begins and whether it follows the patch boundary. Don’t rely on one photograph. Phone cameras can alter brightness and contrast, so the wall should be reviewed in person.
Ask the contractor what the proposed scope is meant to correct. A texture adjustment should address the physical pattern. A color treatment should address the visible color difference. If both are proposed, request separate approval points. That keeps a color concern from turning into repeated texture work.
Existing coatings or earlier repairs may also complicate the visual comparison. Don’t assume every section of the wall has the same history. Ask the contractor to identify the area being used as the reference and explain why it represents the desired finish.
A written sample approval can prevent confusion. It can identify the selected sample, its position, and the agreed viewing conditions. It shouldn’t promise invisibility. It should document the result everyone reviewed before the broader finish work continued.
Keeping color separate from texture makes the final decision more precise. It also helps homeowners explain exactly what still looks different.
What to inspect before accepting the repaired area
Inspect the finished area from near and far. The close view shows individual marks. The longer view shows whether the entire repair forms an obvious shape.
First, locate every edge without someone pointing it out. Notice whether your eye finds the center, the perimeter, or one isolated tool mark. A visible edge may indicate a boundary issue, while an obvious center may suggest a pattern difference.
Next, compare the texture’s density and direction. Look for repeated marks that don’t appear nearby. Check whether raised and recessed areas feel similarly distributed. The goal isn’t mathematical repetition. It’s a visual relationship with the surrounding wall.
Review corners, trim, openings, and wall returns near the repair. These areas can reveal where the finish begins and ends. Confirm that the completed boundary matches the scope you approved. If the scope changed, ask for an explanation before accepting the appearance.
Look at the area under more than one ordinary lighting condition available at the property. Keep your viewing positions consistent. A wall may look different as shadows move, so one flattering angle shouldn’t be the entire review.
Take straight-on and angled photos for your records. Include enough surrounding wall to show context. A tight close-up can document surface detail, but it can’t show whether the patch dominates the elevation.
Ask which concerns relate to texture and which relate to color. Write down any remaining correction in specific terms. “The upper edge has a tighter pattern” gives the contractor more direction than “it doesn’t match.”
Our guide to what a good stucco repair looks like offers another practical review framework. If you’re comparing candidates for the best stucco company in La Presa, focus on the proposed matching process. Ask how samples will be reviewed, where the finish will terminate, and how texture approval stays separate from color.
Verify the contractor through the official CSLB license check. Stucco Pro SD matches homeowners with licensed, independent local pros. The brand doesn’t perform the physical repair.
When to call us
Call when a patch needs texture correction, a wider finish boundary, or professional comparison against the existing wall. This work needs a licensed stucco pro when the repair scope moves beyond a simple appearance review. Call us at (858) 400-4352 and we’ll connect you with a licensed local stucco contractor.