Dryvit inspections look for moisture concerns that a surface-only review may miss. A useful inspection combines visible evidence, targeted meter readings, and clear limits. It helps you decide whether the wall needs monitoring, closer evaluation, or repair.
Why synthetic stucco gets inspected differently from cement stucco
EIFS is a layered synthetic stucco system with foam beneath its exterior finish. The inspection therefore needs to consider both the visible surface and the materials behind it.
A crack, stain, or failed joint may identify an area worth testing. It doesn’t show the full condition of the hidden wall. The surface may also appear intact while a buyer or owner still has concerns about a window, deck connection, or earlier repair.
That makes Dryvit inspections different from a basic visual review of cement stucco. The inspector should identify the wall system first, then explain which inspection methods suit it. Our broader guide to what a stucco inspection covers explains the general visual process.
Names alone aren’t enough. Owners sometimes use “Dryvit” as their description for any synthetic-looking wall. An inspector should document what can actually be observed and identify any uncertainty about the system.
The goal isn’t to label every mark as damage. It’s to build an evidence trail. That trail starts at the finish and follows specific concerns toward the wall beneath it.
What a visual pass can and cannot tell anyone
The visual pass maps conditions before any meter touches the wall. The inspector may record cracks, staining, open joints, damaged finish, previous patches, and changes around wall penetrations.
Photos should show both context and detail. A close photo captures a questionable joint. A wider photo shows whether that joint sits below a window, beside a deck, or near a roof connection. That location matters when deciding where further testing belongs.
Visual evidence can support a testing plan. It can’t confirm the condition of concealed sheathing. It also can’t turn discoloration into proof of trapped moisture or decay.
A careful inspector separates three categories: observed conditions, meter results, and interpretation. Those categories shouldn’t be blended into one broad diagnosis.
The wall elevation matters too. A San Diego County report should distinguish the front, rear, and side elevations. It should identify nearby openings and attachments. A house in Encinitas and one in El Cajon each need property-specific evidence. A general countywide assumption can’t replace observations from that wall.
Surface moisture meters versus invasive probe readings
A surface moisture meter offers a screening pass. The inspector moves it across selected wall areas and watches for readings that differ from nearby comparison areas. The report should identify the meter and explain what its display represents.
Surface scanning helps narrow the search. It doesn’t directly expose the sheathing or prove what material produced a reading. Wall layers, nearby metal, and the instrument’s settings may affect interpretation.
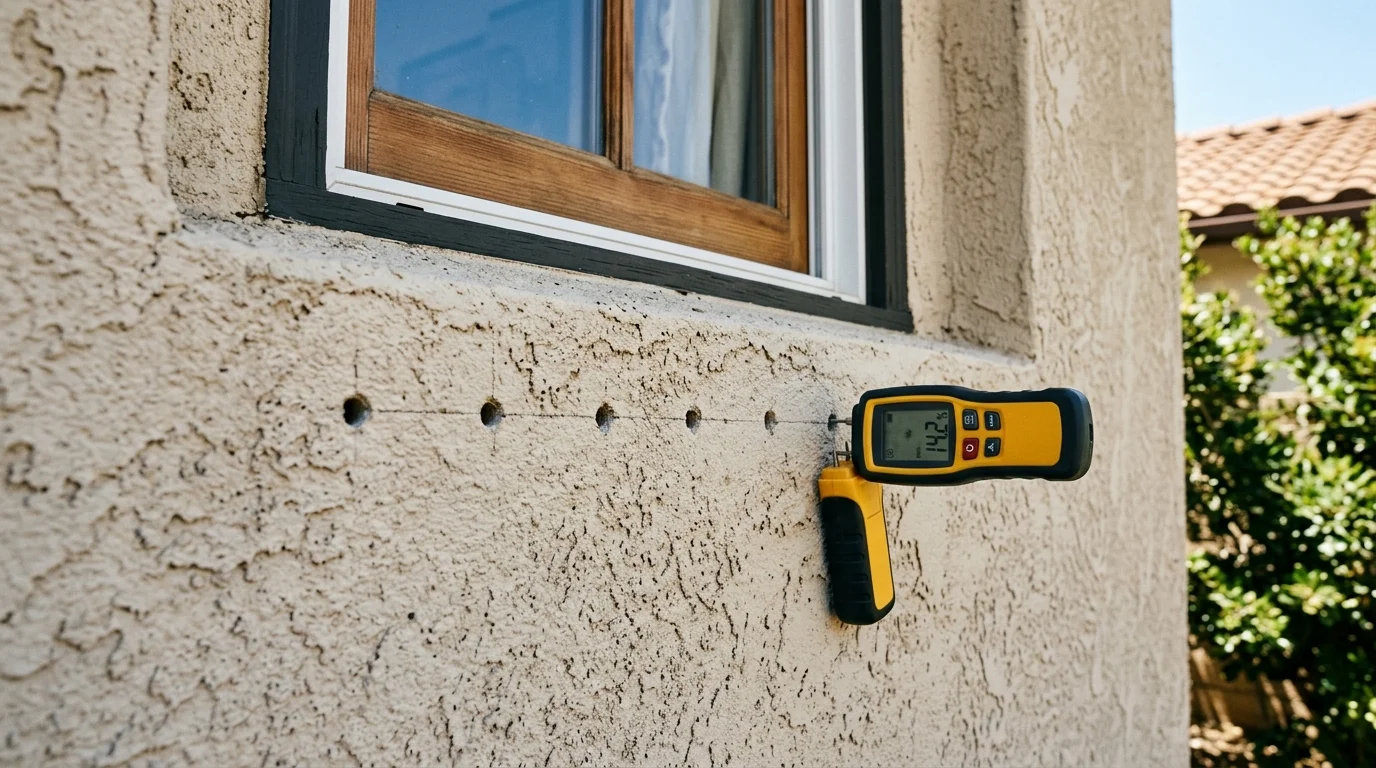
Invasive testing uses small probe holes at selected locations. The probes reach beyond the exterior surface so the inspector can evaluate conditions deeper in the assembly. Because this method penetrates the finish, the owner should understand and approve the testing plan first.
Neither method should be presented as magic. Surface readings provide patterns. Probe readings add targeted evidence. If the two disagree, the report should show that disagreement rather than force a definite answer.
Ask whether the inspector plans screening, probe testing, or both. Then ask how each result will be documented and what limitations apply.
Where the probe holes go and why those locations
Probe placement should follow a reason. Inspectors commonly focus on locations connected to an observed concern, including areas beneath window corners, beside deck attachments, near roof-to-wall junctions, and around wall penetrations.
The exact locations should reflect the building. A probe pattern copied from another house may miss the area that matters here. The inspector should use visible conditions, surface-meter patterns, wall layout, and the owner’s history of the problem.
A comparison location can also add context. That gives the inspector another reading from a nearby area without the same visible concern. The value comes from comparison, not from treating one hole as representative of an entire elevation.
Before testing, ask for a marked plan. It should show proposed locations and explain why each one was selected. Afterward, those locations should appear in the report.
Probe holes also need closure. The inspection agreement should identify who handles that step and what visible trace may remain. Don’t assume testing includes a finish-perfect repair unless the written scope says so.
Reading a moisture number in context, not on its own
A moisture number needs context before it supports a decision. The report should identify the instrument, its scale or mode, the tested material, the probe location, and nearby comparison readings.
No universal threshold for every EIFS wall could be confirmed here. Ask the inspector which written testing protocol or instrument guidance supports the interpretation. That’s more useful than relying on a number repeated without its source.
Recent weather and known leaks should also appear in the inspection notes when relevant. Those details don’t erase a reading. They help the reader understand the conditions present during testing.
Patterns usually tell a clearer story than an isolated result. Several related readings around one opening may justify closer evaluation. One unusual result may call for confirmation before anyone recommends broad removal.
Language matters. “Elevated reading at the lower window corner” reports evidence. “The whole wall has failed” reaches far beyond that evidence. A credible report explains what the reading suggests, what it doesn’t establish, and what next step could resolve the uncertainty.
Windows, decks, roof-to-wall junctions and other usual suspects
Windows, doors, decks, roof connections, pipes, vents, lights, and mounted fixtures interrupt a wall’s open field. During Dryvit inspections, those transitions deserve a deliberate visual pass and a clear record.
The inspector should look at the entire relationship between parts. A mark beneath a window means more when the report also shows the corners, surrounding joints, and wall below. A deck connection needs context from both the attachment area and the adjacent finish.
This doesn’t mean every opening leaks. It means transitions give the inspector specific places to compare, photograph, and test when evidence supports doing so.
Past patching deserves attention as well. A patch may reflect a cosmetic repair, an earlier opening, or another event. Its appearance alone can’t confirm which one occurred. The owner’s records may answer questions that the wall can’t.
For issues already moving from inspection toward repair, read our guide to Dryvit repair. Inspection and repair should remain separate decisions until the available evidence supports a scope.
What elevated readings mean for the sheathing behind the foam
An elevated probe reading identifies an area needing interpretation. It doesn’t, by itself, prove the extent of damage behind the foam.
The reading might support further testing nearby. It may also justify opening a limited section so the underlying materials can be viewed directly. That decision should account for the reading pattern, visible conditions, wall location, and the limits of the instrument.
A report shouldn’t convert moisture data into unsupported claims about mold, decay, structural condition, or indoor air. Those conclusions may require different professionals or direct access to the concealed material.
Owners should also distinguish location from cause. A reading beneath a window identifies where the instrument found a concern. It doesn’t automatically establish where water entered or why the condition developed.
This distinction keeps repair scopes focused. Once the affected area and cause are better understood, a licensed contractor can discuss appropriate EIFS repair. Broad removal shouldn’t be based on one unexplained number.
When an inspection turns into opening a section of wall
A wall opening becomes useful when noninvasive and probe findings can’t answer the main question. Direct access may show the condition of materials that meters can only evaluate indirectly.
That step changes the scope. The owner should know who will open the wall, how large the planned opening is, what will be documented, and who will close it. The agreement should also address what happens if the exposed condition calls for a larger repair.
Permit requirements depend on the actual work and the jurisdiction. Before authorizing demolition or repair, confirm the current requirement with the city or county that issues permits where the property sits.
The person performing regulated stucco work should hold the appropriate contractor license. You can verify a contractor through the CSLB license check.
Opening a wall isn’t automatically the next step after an unusual reading. It’s a targeted way to answer a defined question when less intrusive methods have reached their limit.
What a useful report contains and what it cannot promise
A useful report lets another person follow the inspector’s work. It should identify the property, inspection date, wall elevations, observed conditions, test locations, instruments used, readings, photographs, and stated limitations.
Diagrams help connect numbers to actual locations. Each probe point should have a label that matches the photos and results. Terms such as “high,” “elevated,” or “acceptable” need an explanation tied to the inspector’s stated method.
The report should distinguish findings from recommendations. A documented opening may support further evaluation. It may not yet define the full repair boundary. A repair recommendation should explain which evidence led to that next step.
No inspection can promise the condition of every concealed area that wasn’t tested or opened. That limitation belongs in plain language, not buried in vague boilerplate.
Before accepting the report, check whether it answers your original concern. You should be able to identify what was inspected, what was found, what remains unknown, and who should handle the next decision.
Inspections at a sale, and why timing matters
During a property sale, Dryvit inspections can affect several decisions at once. Buyers may need time for testing, report review, follow-up access, contractor input, and repair discussions.
Start by confirming who can authorize invasive testing. Probe holes penetrate the finish, so access permission shouldn’t be assumed. The purchase agreement and inspection instructions may also set deadlines. Ask the real estate professionals handling the transaction to identify the dates that apply.
Schedule enough room for questions after the report arrives. An elevated reading may lead to confirmation testing or a proposed wall opening. A rushed schedule can leave the parties debating a number without the context needed to understand it.
Sellers should keep earlier inspection and repair records available. Buyers should compare those records with current test locations instead of assuming an old repair covers the present concern.
The inspection’s job is to document conditions and limits. Repair pricing, responsibility, and contract terms are separate decisions for the parties and their chosen professionals.
When to call us
Call when Dryvit inspection findings point toward damaged finish, targeted wall opening, or EIFS repair. The physical work should be evaluated and completed by a licensed stucco professional.
Call us at (858) 400-4352 and we’ll connect you with a licensed local stucco contractor.